ISFS610: Payment Processes And Technology

Process Flow
Step 1: Product Definition
Perform the following steps:
-
Enter SIDPRMNT in fastpath.
-
Product Code: Enter a 4 letter alphanumeric product code of your choice
-
Product Description: Provide a relevant description
-
Instruction Code: Enter a 4 letter alphanumeric instruction code of your choice.
-
Slogan: Standard Instruction
-
Product Group: SIPAY
-
Remarks: Provide a relevant remarks to create a Standing Instruction Product
-
Start Date: 09/30/2011
Access link http://10.0.106.98:7001/FCJNeoWeb/LoginServlet using the credentials provided to you.
For SI product, generic attributes such as branch, currency, and customer restrictions, interest details, tax details, etc., can be created by clicking on the appropriate icon in the horizontal array of icons of screen.

Step 2: Preferences
Click "Preferences" tab and input the following fields:
-
Processing Time: EOD
-
Holiday Exception: Forward
-
Action Code Amount: Partial Liquidation
-
SI Type: One to Many
-
Standing Order With: Free Format Payment Details
-
Rate Type: Standard
-
Maximum Retry Count: 2
-
Retry Count Advice: 0
-
Days: 7
- Click Ok
Preferences are the options that are available to define the attributes of a product. The options that are chosen in this screen ultimately shape the product. Some of the attributes defined as preferences can be changed when an instruction is processed under the product.

Step 3: Charges
Click "Charges" tab and input the following fields:
-
Click "+" to add a new record
-
Component: Choose SI_CLASS1
-
Settlement Currency: USD
-
Check the checkbox "Allow Amendment"
Add another record
-
Component: Choose SI_REJECT
-
Settlemen Currency: USD
-
Check the checkbox "Allow Amendment"
Add another record
-
Component: Choose SI_SUXS (Choose SI_REJECT where Charge rule is SICHGRULE2)
-
Settlement Currency: USD
-
Check the checkbox "Allow Amendment"
-
Click Ok
The charges applicable for an instruction are defined for the product under which the instruction is processed. These charges will be defaulted for the instruction you are processing. A charge can be applied for the following events:
-
Successful execution (SUXS),
-
Partial execution (PEXC), or
-
Rejection (REJT)
It is necessary to specify the party who bears the charge: the remitter or the beneficiary.


Step 4: Accounting Roles
Click "Accounting Roles" tab and input the various accounting details
-
Accounting Role: SI_CLASS1INC Accounting Head: 321000504
-
Accounting Role: SI_REJECTINC Accounting Head: 321000504
-
Accounting Role: SI_SUXSINC Accounting Head: 321000504
-
Accounting Role: TAX12_PAY Accounting Head: 225000501
-
Click Ok
Click ‘Accounting Roles’ button to define accounting roles for the product you are creating. In the screen that corresponds to this icon you can map Accounting Roles to Accounting Heads.

Step 5: Events
Click "Events" tab and input the various events
-
There are several events required to create a bill product. Input the accounting entries and advices of those events that are necessary by referring to the snapshot.
Click "+" and add the following 'Events'
-
OPEN
-
CLOS
-
AMND
-
PEXC
-
REJT
-
RPEN
-
SUXS
The event details screen of instruction processing will show the details of the accounting entries generated for an instruction.

Input the 'Accounting Entries' for OPEN event as shown below:

Input the 'Advices' for OPEN event as shown below:

Input the 'Advices' for CLOS event as shown below:

Input the 'Advices' for AMND event as shown below:

Input the 'Accounting Entries' for PEXC event as shown below:

Input the 'Accounting Entries' for REJT event as shown below:

Input the 'Advices' for RPEN event as shown below:

Input the 'Accounting Entries' for SUXS event as shown below:

Input the 'Advices' for SUXS event as shown below:

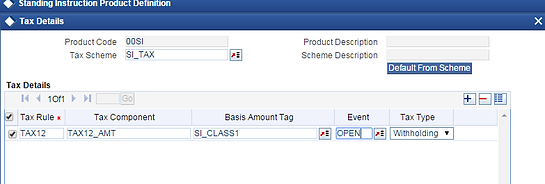
Tax can be processed on the charges that are earned for an instruction and on the instruction amount itself. Tax is applied based on the tax scheme linked to the product, under which the instruction is processed.
Step 6: Tax
Click "Tax" tab and input the tax details
-
Click "+" to add a new record
-
Tax Scheme: SI_TAX
-
Click "Default from Scheme"
Under "Tax Details" input the following fields
-
Basis Amount Tag: SI_CLASS1
-
Event: OPEN
-
Click Ok

Step 7: Save product
-
Click Save. Note down your product code.
-
Few warnings will be displayed. Click Ok. The record will be saved.
-
Provide a screenshot after saving the record.

Step 8: Standing Instructions Details
Close all windows and choose Branch 013
Enter SIDCONON in fastpath
-
Click New
-
Enter the product code that you created and click "P"
Input the following fields
-
Debit Account Branch: 013
-
Debit Account: Use the account number provided to you
-
Debit Currency: INR
-
Credit Account Branch: 013
-
Credit Account: Use any account number from the list of values with currency INR
-
Credit Currency: INR
-
SI currency: INR
-
Expiry Date: 01/09/2012
-
SI Amount: Mention amount according to the business case
If 2 or more standing instructions are to be made (Eg. Business Case 1), then click "+", input a different credit account number and amount by clicking and then save. Otherwise just click Save.
The details of an instruction are recorded in the 'Standing Instructions Online Detailed' screen.
The following details are to be specified while defining SI contract.
-
Counterparty on behalf of whom the instruction is being recorded
-
Currency of the instruction
-
Amount that has to be transferred during each cycle
-
Account that has to be debited
-
Account that has to be credited
-
Date on which the instruction has to be executed (first due date)
-
Date until which the instruction has to be executed (expiry date)
-
If the debit account is involved in more than one instructions falling due on the same day, you can allot the priority with which an instruction has to be processed.
